The Svartisen Glacier is located in Northern Norway, within the Saltfjellet–Svartisen National Park. More specifically, it lies a bit south of the Lofoten Islands and just north of the town of Mo i Rana, from which it’s around 30 kilometers to the nearest hiking trailhead.
Svartisen consists of two separate glacier areas, which together make up Norway’s second-largest glacier.
We hiked to the glacier’s edge during our Northern Norway road trip, and in this post, you’ll find practical information and our personal experience of the hike to the Svartisen Glacier.
Hike trail to Svartisen Glacier (Svartisen Rana)
Distance: Around 14–15 km round trip if hiking the whole way. If you take the boat across the lake (190 NOK/person/one way), the walking distance is reduced to about 6 km round trip.
Difficulty: Moderate
Starting point: Svartisen Rana
Elevation gain: 290 meters
Scenery: The beginning of the trail leads through forest along Lake Svartisvatnet, surrounded by mountains. Then the trail continues over stunning rocky terrain toward the glacier. At the end, the reward is a massive, blue-tinted glacier that is nothing short of breathtaking.
Getting there – Parking and starting point
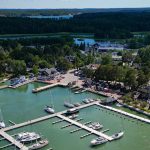
We chose the trail that starts from Svartisen Rana, on the shore of Lake Svartisvatnet. From Mo i Rana, it’s just a little over 30 kilometers. At the lake’s edge, you’ll find a parking area and a campground where you can stay overnight either with a campervan or a tent.
The last 5 kilometers of the road leading to the parking area/campground is a toll road (150 NOK), which includes day parking. Instructions for payment are posted at the beginning of the toll road, and payment must be made within 48 hours. It’s a good idea to take a photo of the payment instructions, as we didn’t have mobile service in the area and were only able to complete the payment once we had left the valley.
There’s also a small kiosk at the trailhead, but according to what we’d read—and based on our own experience—its opening hours are very irregular. It was closed when we were there. Near the parking area, there appeared to be toilets and trash bins, but we didn’t explore other facilities in detail.


Toward the Glacier
There are two ways to reach the glacier: You can either hike the entire way, or take a boat across the lake to cut the walking distance roughly in half.
We chose to hike the full route, which totals around 14–15 kilometers.
The trail begins at the edge of the lake, behind the nearby buildings, and follows the shoreline, sometimes right along the water, sometimes slightly inland. The path isn’t marked with signs, but it’s fairly easy to follow thanks to the well-trodden footpaths. As long as you stick to the direction of the lake, you’re on the right track.
This section doesn’t involve any real elevation gain, but the trail does undulate up and down, which makes it slightly more demanding than a flat walk. The entire stretch passes through fairly lush forest, with thick vegetation in places, and the trail can be very muddy—so good footwear is a must. There are also a few small stream crossings, though we managed to keep our feet dry without issue.
This lakeside portion of the trail is about 4 kilometers each way, but because of the terrain, it felt much longer and we wished it would end. It took us about 1 hour and 20 minutes to complete this part.


Forest opens up and the views expand
After the forest section, the landscape begins to open up as you reach the far end of the lake—this is also where the boat dock is located for those who take the water route. From here, it’s about 3 kilometers to the glacier.
The trail begins its one and only real climb from this point, ascending gradually over the next 1+ kilometer. It runs alongside a rushing stream, whose thunderous sound is quite powerful in places. Near the top of this ascent, there’s a lovely spot for a break, where a torrent of water gushes from an underground tunnel, forming what could be classified as a waterfall.
After this short rest, the remaining climb is minimal and the terrain flattens out again. From the boat dock onward, the trail is marked quite clearly with painted signs on the rocks.
The route now winds across striking slate rock formations. While there’s no major elevation gain, there are sections that require high steps and a bit of effort. Small ponds and pools glisten in the sun, reflecting the light beautifully.
The trail leads toward the Austerdalsvatnet lake, located beneath the glacier and surrounded by dramatic mountains. This part of the trail was incredibly enjoyable, and the stunning views were a treat for the eyes.


The glacier appears
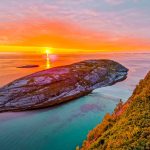
When you reach the shore of Austerdalsvatnet, the full view of the massive Svartisen Glacier finally opens up. Flowing down from between the mountains, its bluish-white surface is truly awe-inspiring. Near the shore, there’s a small shelter that provides protection in case of bad weather and makes for a great spot to take a break.
From this point, we headed toward the glacier, which feels deceptively close. In reality, it’s still roughly one kilometer from the shelter to the glacier’s edge.
We chose to approach via the higher slope, and at times we had to search for a suitable route. The folds and ridges of the rock were much higher and steeper than they appeared from a distance—what looked like small bumps turned out to be formations twice our height.
Walking across the rock requires great care, as there are many loose stones scattered over the hard surface, making it quite slippery.
A route closer to the water’s edge might have been easier, but we didn’t try it, so we can’t say for sure.
The closer you get to the glacier, the more overwhelming it becomes. With each step, it seems to grow in size—or maybe it just makes you feel smaller. Next to a glacier tens of meters thick, humans look tiny.
When visiting glaciers, it’s crucial to remember that getting too close is dangerous. Glaciers are unpredictable and can break apart suddenly, releasing ice chunks the size of cars. Always keep a safe distance—about 100 meters—from the glacier’s edge.
We spent a good amount of time admiring and photographing the glacier. We had planned to climb the slope of the adjacent mountain for a different perspective, but dark clouds began gathering above the glacier, and we feared a thunderstorm might be approaching. For safety reasons, we decided not to go any higher and took a few final glances before starting our return journey.
We didn’t want to be caught on slippery rock in heavy rain, and besides, we still had the whole hike back ahead of us—which we preferred to do without getting soaked. Also, it was getting late, and by the end of the return hike, we found ourselves walking the final stretch through the forest by flashlight.


Svartisen Glacier – A fantastic day hike destination
Overall, we can highly recommend a visit to the Svartisen Glacier. The full hike is very doable for anyone with a reasonable level of fitness, and if you prefer, you can reduce the effort significantly by taking the boat. Just make sure to check the time of the last departure if you don’t want to hike both ways!